6.28.2011

Brioche

The long-awaited promise brioche is finally here! I have to warn you (like my cookbook warned me) that this bread definitely takes patience. So take advantage of a great opportunity to learn one of God's greatest but most difficult virtues! The result will be SO worth it; since it has a lot of eggs and butter, the longer rising times will make sure that it doesn't end up a pancake brick.

With no further ado, since I don't want to make you wait any longer than you have to...

Ingredients:
- 1/4 very warm water (105*-115*)
- 1 1/2 teasp. active dry yeast
- 4 cups bread flour
- 7 large cold eggs
- 1/3 cup sugar
- 2 1/2 teaspoons salt
- 1 1/4 cups cold butter
- 1/2 cup poolish ------------------------------------------------------->


Poolish
Ingredients:
- 1/4 cup very warm water (105*-115*) 
- 1/8 teaspoon dry active yeast
- 1/4 cup + 2 Tbls cool water (75*-78*)
- 1 cups flour

Combine warm water and yeast in a medium sized bowl and whisk until yeast is dissolved. Let stand for 3 minutes. Add the cool water and flour and stir vigorously for 1 minute, till it is smooth and elastic. 
Scrape down the sides of the bowl and cover with plastic wrap. Make sure you have room in the bowl for it to triple in volume. 
Let it rise at room temperature for 6-8 hours, OR 1 hour and then place in refrigerator overnight. 
Remove it from the fridge 3-4 hours before use, so it can warm up and become active again. 
Use it within the next 2-4 hours, before it begins to deflate and die.  


1. Combine the very warm water and yeast and stir to dissolve. Let sit for 3 minutes.
2. In a mixing bowl/bowl of a standup mixer using a dough hook, combine the yeast mixture, flour, cold eggs, poolish, sugar, and salt and mix on medium-low speed for three minutes. Increase speed to medium and mix for 2 more minutes till all the flour is moistened and gathered into a ball of dough. Add more flour as needed to pull it all together into a ball of dough. Mix for another 10 minutes, or until the dough sounds like it is slapping the sides of the bowl.
 3. While the dough is mixing, take the butter from the fridge and put it in a ziplock back. Use a rolling pin to smash it into a big malleable mess. When the dough is ready, add the butter in 1 inch pieces. You don't have to wait for it to incorporate each time, and it may clump to one side, but just let it keep mixing and scrape it down as needed. Continue to mix for 8-10 minutes on high. The original recipe didn't talk about needing more flour, but I added some more at this step because it still seemed very wet. You may follow your gut =). 
4. Put the dough in an oiled bowl, cover, and let rise for 1-2 hours, till it has doubled. 
5. Refrigerate for 1/2 an hour so it's easier to handle.  While the dough is cooling, oil the two loaf pans well. 
6. Pour the dough onto a lightly floured surface. It will tend to "ooze" and spread out a bit (not keep it's form like normal dough) and that's okay. Divide it in half.
7. Press one half into a rectangle, with the short edge being about as long as your loaf pan. Fold the top edge down a third, fold the bottom edge up over on top (like a 3-fold business letter). Press along that top edge to seal it, then gently roll the edge underneath and shape it to fit into your loaf pan. Don't roll these guys too tight. Press the ends to seal the edges, and place into pan; use your knuckles to press down firmly along the length of the dough so it fills the pan evenly. Repeat with second loaf.
8. Cover the loaves with an oiled plastic wrap and let rise till they are getting close to the top of the pan. This is where you wait... probably 2-3 hours. Remove the plastic wrap. 
9. Continue to let rise until they are about an inch above the tops of the pans. Maybe another hour. 
10. Thirty minutes before you think they'll be ready to bake, preheat the oven to 375*. Place a smaller pan with about 2 cups of water in the oven as well, to create some moisture inside. 
11. Bake the bread for 20 minutes, check and/or rotate, then bake for 15 more minutes. The loaves with be VERY dark, but that's what makes them realllly yummy. When the time is up, tip one loaf out of it's pan and tap the sides; if it sounds nice and firm and hollow, it's done. If the sides are still too soft, bake for another five minutes. 
12. Remove them from the pans and let cool on a wire rack. 
13. Enjoy!! This makes AMAZING french toast.  
6.22.2011

Coming Soon! Brioche

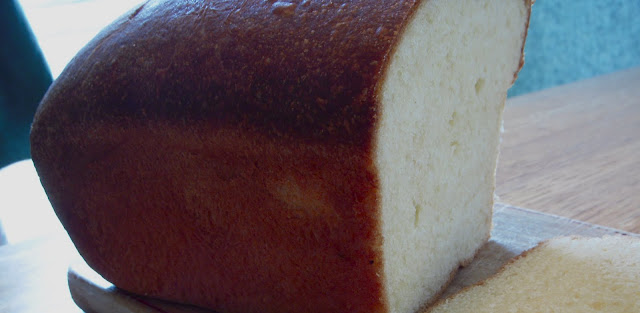
I apologize ahead of time for giving you a reason to covet. But I promise that I will get the recipe up very soon. For now, here are some pictures of a wonderfully buttery, flaky, french loaf of Brioche ... 

Edit: My apologies; I posted these pictures right before I left for a work conference and am now sitting in a hotel in Baltimore. Thus my recipe is at home. I promise I will post is first thing next week. =)


6.20.2011

Potstickers

I am moving up in the technology world and have video! It was too hard to try and explain how to fold these little guys, so I hope the video clips below will help more than my words would. 

These are some of my favorite things to eat for lunch or a midnight snack, and are easy to transport once cooked for packed lunches and/or church potlucks or whatnot. 

This is definitely an "asian-fusion" dish that you probably will never find in any restaurant either here in America or in China; I guess you could say it's a family recipe. Most traditional potstickers are made with napa cabbage instead of spinach, and commonly boiled instead of pan fried/steamed. I feel like the spinach is first of all better for you, and secondly, adds a depth of taste that cabbage doesn't have. 


This recipe could probably serve about 3-4, or the meat mixture could be re-frozen and saved for later.

Ingredients:
- 1 pound ground chicken/turkey (you can use beef too, but it gets kind of fatty)
- 1 small onion, finely chopped
- 3-4 cloves of garlic, smashed and chopped
- 2 cups chopped fresh spinach
- 1 egg
- 3-4 dashes of fish sauce OR a teaspoon or two of salt
- 1/2 teaspoon black pepper
- A large package of potsticker skins

Mix everything in a medium bowl. 


Every person has different tastes and I'm a big fan of cooking to your own liking, so I like to microwave a little piece for 20 seconds to check and make sure everything tastes okay. And I don't normally cook with exact measurements so it's always a good safety...


Here are a couple videos on assembling the potstickers. Start by wetting the top half edge of the potsticker skin. The first two videos are from two different perspectives. The third clip is a simplified version is the first is too much of a finger-ful. It is a bit complicated and takes a bit of practice to get it down, so no worries if it's not perfect the first time!  


To cook, heat a frying pan that has a thin layer of oil on the bottom. Place the potstickers in the pan, with the flat side down and the edge directed up. Cover, and cook over medium-high heat for 2 minutes, or until the bottoms of the  potstickers are browned. Lift the lid, and quickly but CAREFULLY pour half a cup of water into the pan and immediately replace the lid. Leave the lid on and steam for at least three or four minutes, until the water has all evaporated, and your largest potsticker is cooked through. Use a metal spatula to lift them out of the pan. 

Mix together a little bit of soysauce, a little bit of rice vinegar, and some chili paste for a dipping sauce. 
Enjoy!


6.15.2011

Snickerdoodles


I am not as strong as I seem. Or would like to be. Today is the fateful day where I crossed the line between at least pretending that I have a reason to bake cookies and baking cookies because I am missing my boyfriend and want to sit and eat something sweet and feel sorry for myself. I've made it 20 days, with 55 to go, so I guess it's not a horrible record. Regardless, I made some pretty killer snickerdoodles, and figured the least I could do was to share them with you all. 


  • 1 cup butter
  • 1 cup white sugar
  • 2 eggs
  • 2 3/4 cups sifted all-purpose flour
  • 1 teaspoon baking soda
  • 2 teaspoons cream of tartar
  • 1/4 teaspoon salt
  • 2 tablespoons white sugar
  • 2 teaspoons ground cinnamon

  • Preheat oven to 400 degrees F (200 degrees C)
  • Place the butter in a medium saucepan, and melt over medium heat until the butter is browned. It will go from melty to foamy to bubbly to flat; stir constantly so it doesn't burn. Let it cool for 5 minutes in the fridge.  It will still be a bit warm.
  • In a large bowl, mix together the butter and 1 cup of white sugar until smooth and the butter is completely cool. Stir in the eggs one at a time, blending well after each. Combine the flour, baking soda, cream of tartar and salt; stir into the batter until blended. 
  • Roll the dough into balls the size of small walnuts. Roll in a mixture of 2 tablespoons sugar and 2 teaspoons cinnamon. Place 2 inches apart on an ungreased cookie sheet.
  • Bake in the preheated oven for 8 to 10 minutes or until lightly browned, but still soft.


Dunk them in a glass of vanilla almond milk and enjoy!


6.13.2011

Pesto Cream Pasta

I am a very bad blogger, I know. After being offline for a week, then being thoroughly embarrassed at the lack of activity here for another week, I am finally back to face the music and start afresh. And hopefully, I will be able to win you all back with this simply divine meal of pasta with pesto cream sauce and tomatoes.

The recipe came initially from The Pioneer Woman, so credit where credit is due. Not that she needs it, but this is my official recommendation for her brilliant culinary skills. And her photo skills...(photo below is hers).

Ingredients:
- 1 cup fresh basil leaves
- 1/2 fresh shredded parmesan cheese
- 1/4 cup pine nuts (yes I know they are DREADFULLY expensive. But so worth it.)
- 2 cloves of peeled fresh garlic
- Salt and pepper to taste
- 1/3 cup olive oil
- 1/2 cup heavy cream
- 2 tablespoons butter
- 1/4 (additional) parmesan cheese
- 12 oz. pasta
- 2 large plum tomatoes, diced


Cook the pasta as directed on the package.

Blend basil, 1/2 cup parmesan, pine nuts, garlic, and salt and pepper together in a blender or food processor (I used a blender, and I think I would recommend a food processor if you have one...). Drizzle in the olive oil once well-blended, and continue to mix until combined. You can add more olive oil if necessary to make a nice paste.

Heat the cream and butter in a saucepan till melted. Remove from heat, add the basil mixture and stir together.

Pour the pesto cream over the pasta, and mix well; add the tomatoes and toss together. Serve!

You can also add grilled chicken breast for some protein; cook the chicken beforehand, and slice into small chunks. Toss with the pasta when you add the tomatoes. Enjoy! I know I sure did. The picture below is the only one that turned out in my haste and excitement to actually start eating.

6.01.2011

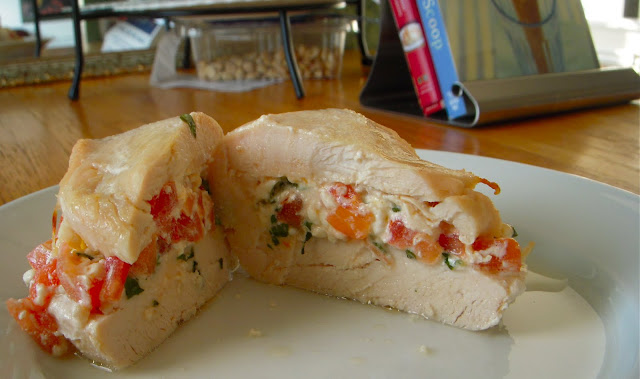
Feta, Tomato and Basil Stuffed Chicken Breast


 This recipe was inspired by my dear friend Anna W., who got the recipe from a friend of hers. As much as I wish to claim this brilliance as mine, credit must be given where credit is due! 
Needless to say, it is just as good or even better than it looks and sounds.

Ingredients:
- 2 chicken breasts
- About 3/4 cup crumbled feta cheese
- The same of a seeded and diced tomato
- A handful of fresh basil, chopped
- 1 tablespoon olive oil
- Butter


Preheat oven to 375*.
Mix together the feta, tomatoes, basil, and olive oil in a small bowl.
Lay out the chicken breast on a cutting board, and beat it with a tenderizer or (as in my case), a rolling pin with a layer of wax paper to manage the splatterings till flattened. Try and make sure you don't beat any holes into the breasts; you want the filling to be able to stay inside. I like smaller portions, so I sliced each chicken breast down the middle (after being flattened). 
Place a handful of the feta mixture on one side of each chicken breast, and fold the other side over. Repeat with all chicken.
Grease an edged baking pan (I used a 9x9 glass one with a 2-inch edge) with olive oil, then place stuffed chicken breasts in it, spaced evenly. Put a dab of butter on the top of each, and sprinkle with some freshly ground pepper. 

Bake for at least 30 minutes; use a meat thermometer to make sure that the chicken is done. 

Serve with a side of veggies and quinoa or brown rice, and enjoy!


Contributors